Hello. I’m Penny.
 I’m halfway through a ceramics design course and my homework is to write a blog.
I’ve always been interested in crafts and learnt to knit and sew as a child


In 2010 I took up ceramics at my local adult education college, making mostly wheel-thrown functional domestic ware.

In 2017 I started an HNC diploma in 3-D design (ceramics), which seems a bit of a mouthful so I call it How to Make Better Cat Dishes. My aim is to learn new making and decorating techniques and to think about the design beforehand so that I make better, more considered pots rather than just sitting at the wheel and throwing whatever the lump of clay wants. The course emphasises ideas generation and research. I have to keep a sketch book and technical journal (rather than just the notebook I used to use) as a record of the development of my work from initial idea to finished piece. It is a good (if onerous) discipline. I often use Pinterest boards to collect together visual ideas for a particular project. The boards act as reminders of makers and techniques for further research and I put the results in my sketch book. I have always enjoyed going to exhibitions. I now look at the work more critically and analytically, taking notes (and photos, where possible). These, too, go in my sketch book. Artists’ open studios are another excellent resource. It’s an invaluable opportunity to talk to contemporary makers who always seem happy to share their ideas and expertise and I get to fondle their pots. A favourite is Vanguard Court in Peckham, home to Chris Keenan, Carina Ciscato and Sun Kim, three potters who offer very different takes on wheel-thrown porcelain.
The assignments each term have been in two parts, a theme for making and ceramic techniques to learn. The first theme was Small batch production: pouring vessels with different construction methods.

An exercise in soft earthenware slabs – making copies of other potters’ work. Hideous.

My own design in hard earthenware slabs. Also hideous.
However, I did go on to make an earthenware piggy bank, part thrown and part slabbed, so I must have learnt something.

The body and trotters are joined when leather hard – a hard slab technique.
The ears and curly tail are soft slabs.
Here are some pourers I threw – they would not be out of place on my kitchen dresser.

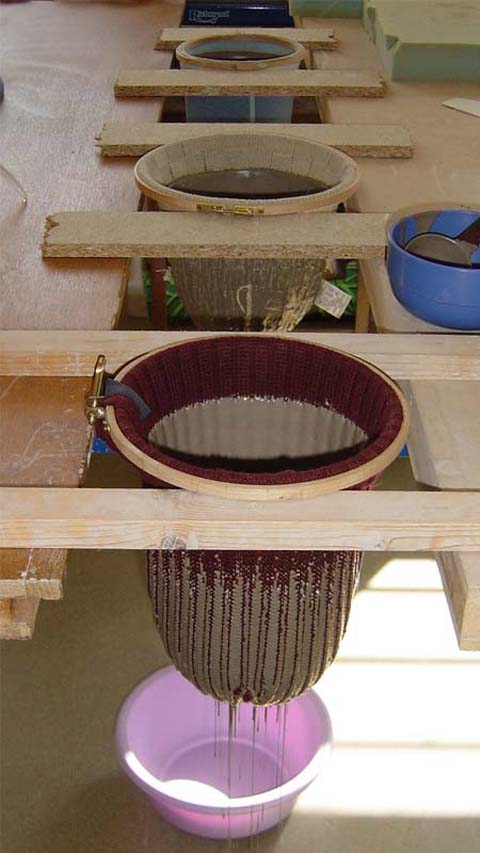
I was introduced to porcelain casting slip, a very different medium. I tried a burn out technique where the slip is added to material which will burn away in the kiln.

I sewed a pourer out of cotton muslin (it has to be natural fibre), dipped it in slip and hung it up to dry. There is an intriguing dissonance between the soft drape of the fabric and the brittle rigidity of the porcelain.

It is possible to see the weave of the fabric and details of the sewing inside.
I tried knitted shapes with similar results.


They are unexpectedly light as the ceramic is much lower density than pure clay. On a practical note, burn out pieces can be porous, which isn’t ideal for a pouring vessel. The knitted pieces weep gently if I fill them with water.
I have tried to use the new techniques in different assignments. This gives me the chance to develop them and reinforces my learning. The theme for the final term was Enclosure and I continued with burn out forms and porcelain slip. I made a rattle (below) by enclosing pre-fired ceramic beads in an inflated balloon, being careful not to burst the balloon (again), and then draping strips of slip-soaked muslin across it. I based the shape on a Sri Lankan brass rattle which I found in the British Museum online catalogue.

I knitted a pig, also dipped in slip, and used a balloon and strands of yarn to support the shape as it dried (see Burnout post).

I didn’t add enough slip where the legs joined the body and cracks appeared during bisque firing. I repaired them with paper clay and rebisqued but it still wasn’t enough and the right foreleg collapsed during the glaze firing. Fortunately, the pig balances well on its tail in an amiable, waving pose. It has a slot in its back and enclosed ceramic coins.
I had hoped to see more of the stitch texture with the knitted forms. It doesn’t show at all in the pourers (unlike the muslin). It is vaguely visible on the edges of the pig’s ears and snout and can just be seen inside in the right light. After making them, I discovered the work of Helen Gilmour, Caroline Andrin and Annette Bugansky, who use knitted vehicles for their slipwork, with beautifully clear results. I shall write about them in my next blog.
~~~
Post Script: Before and After
I made cat water dishes at the beginning and end of the year. The first was based on the idea of Beneath. I used newspaper resist (a sort of negative stencil) and coloured slips to hide a design beneath the different layers of slip. I didn’t apply the slips carefully enough and they blistered on firing, which spoilt the design, and I don’t like the final colours very much. The second was part of the Enclosure project. I painted on coloured slips (more carefully this time) then used frog tape at the glaze stage to mask an enclosed pond design. I had problems getting enough glaze onto the pot, especially on the outside, so again the design isn’t quite as intended but the colours are better. I know which one the cat prefers.